 novityinfo
How to Schedule Mailchimp Campaigns Using Google Calendar: A Step-by-Step Guide
Advertisement
In today's fast-paced digital world, staying organized is key to success. Whether managing a small business or running a marketing campaign, keeping track of your tasks can get overwhelming. For email marketers using Mailchimp, scheduling campaigns can often become tedious. However, integrating Mailchimp with Google Calendar can streamline the entire process, providing an organized approach to email marketing. This guide will show you how to easily schedule Mailchimp campaigns using Google Calendar.
Why Use Google Calendar for Scheduling Mailchimp Campaigns?
Google Calendar isn't just for keeping track of appointments and meetings; it can also be a powerful tool for managing your Mailchimp email campaigns. By integrating Mailchimp campaigns with Google Calendar, you can:
- Stay on top of campaign deadlines.
- Set reminders for sending emails.
- Organize marketing efforts efficiently.
- Align campaigns with product launches, promotions, or events.
With Google Calendar, you can create a structured approach to managing your campaigns and ensure nothing is missed. Now, let's explore how you can set up your campaigns.
Step-by-Step Guide to Scheduling Mailchimp Campaigns Using Google Calendar:
Step 1: Create Your Mailchimp Campaign
Before scheduling your Mailchimp campaign, you need to set it up. Here's a simple process:
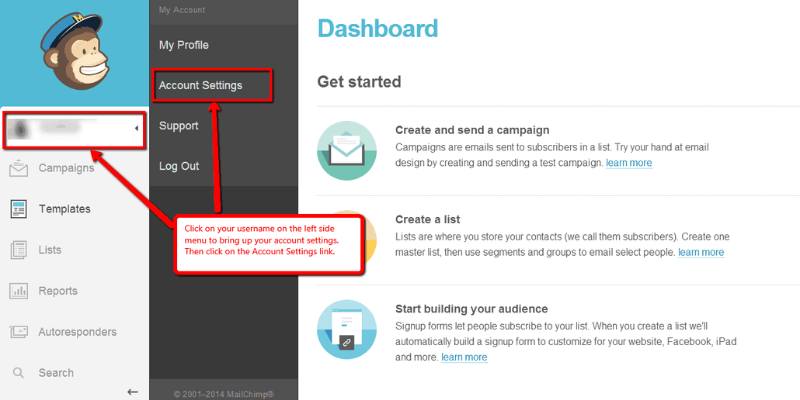
- Log into Mailchimp: Open Mailchimp and log in to your account.
- Create a Campaign: Select 'Create Campaign from the dashboard.' Choose the type of campaign you wish to run, such as an email or automated series.
- Design Your Email: Customize your campaign with the appropriate content, subject lines, images, and call-to-action buttons.
Once your campaign is ready, it's time to set a sending schedule.
Step 2: Determine Your Campaign Send Time
When planning your campaign, choosing the right time for it to go live is essential. Start by considering when your audience is most active, using insights from past campaign performance or industry trends. Aim for a date and time that aligns with your marketing goals or overall business objectives to maximize impact. Once you've finalized the timing, use it as a trigger to create a reminder in Google Calendar. This step ensures you stay organized and on track, helping your campaign launch smoothly and effectively.
Step 3: Add Mailchimp Campaign to Google Calendar
Now, let's integrate your Mailchimp campaign with Google Calendar:
- Open Google Calendar: Go to your Google Calendar by visiting https://calendar.google.com.
- Create a New Event: Click on the 'Create' button on the left-hand side of the screen. A new event window will appear.
Now Set the Event Details:
- Title: Name the event something like "Mailchimp Campaign: [Campaign Name]."
- Date and Time: Set the date and time based on your chosen campaign schedule.
- Description: Add relevant details, such as the subject line, content highlights, or any last-minute changes you must remember before sending the campaign.
- Set a Reminder: Under the 'Notification' section, set a reminder notification for when you need to send the campaign. You can opt for a reminder a few hours or a day before the scheduled time.
- Add Attachments: To attach campaign-related files or documents (like graphics, drafts, etc.), click 'Add Attachment' to upload them directly to the event.
- Save the Event: Once all the information is filled in, click 'Save'.
Now, you'll have a reminder on your Google Calendar for when to send out your Mailchimp campaign.
Step 4: Use Recurring Events for Ongoing Campaigns
If you're running a recurring email campaign, Google Calendar allows you to set repeating events. This is helpful if you want your campaigns to follow a set schedule, like monthly newsletters or weekly updates.
To set up a recurring event, open the event creation window in Google Calendar and click 'Does not repeat.' From the dropdown menu, choose how often you'd like the event to repeat—daily, weekly, monthly, or customize it to fit your campaign schedule. After selecting the desired time interval, click 'Done' to apply your settings. Finally, click 'Save' to confirm and create the recurring event. This ensures your campaigns remain consistent and automated, reducing the need for manual rescheduling each time.
Now, Google Calendar will automatically remind you of every recurring campaign that needs to be scheduled in Mailchimp, saving you time and ensuring consistency.
Step 5: Sync Google Calendar with Mailchimp
While Google Calendar doesn't offer a direct Mailchimp integration, you can integrate both using third-party automation tools like Zapier. Zapier is a great platform for creating automated workflows between Google Calendar and Mailchimp. With Zapier, you can trigger actions in Mailchimp from your Google Calendar events.
For example, you can create a Zap (an automated workflow) that sends a campaign when a Google Calendar event reaches its set time. Here's a brief outline of how you can do this:
- Create a Zapier Account: If you haven't already, visit www.zapier.com and sign up for an account.
- Connect Google Calendar and Mailchimp: From the Zapier dashboard, select Google Calendar as the trigger app and Mailchimp as the action app.
- Set Up Your Trigger: For Google Calendar, choose 'New Event Start' as the trigger event.
- Set the Action: Choose 'Send Campaign' in Mailchimp as the action event.
- Customize the Workflow: Follow the prompts to map the relevant fields from Google Calendar to Mailchimp, like selecting the campaign to send or which list to target.
After setting up the Zap, your Mailchimp campaigns will be sent automatically when Google Calendar events trigger them. This integration further streamlines your marketing efforts and ensures you never miss deadlines.
Step 6: Track and Adjust Your Campaigns
Once your campaigns are scheduled using Google Calendar, tracking and updating them becomes much easier. Simply view your calendar to monitor upcoming campaign dates and make timely adjustments. After launching a campaign, use Mailchimp’s analytics tools to review its performance and gather key insights.
If there’s a change in your strategy, you can easily edit the event in Google Calendar and reschedule or modify the campaign within Mailchimp. This seamless integration allows you to stay organized, make data-driven decisions, and adapt quickly without disrupting your overall marketing plan.
Best Practices for Using Google Calendar with Mailchimp:
To maximize efficiency when using Google Calendar and Mailchimp together, consider these best practices:
- Set Clear Goals: Clarify the purpose of each campaign to determine the best times to send it.
- Use Color-Coding in Google Calendar: To improve organization, color-code your events based on campaign type (e.g., newsletters, promotions, seasonal offers).
- Sync with Team Members: Share the calendar with your marketing team to ensure everyone is on the same page regarding the campaign schedule.
- Automate where Possible: Use tools like Zapier to reduce manual tasks and ensure consistency.
- Review Performance Regularly: Set recurring Google Calendar events to review past campaigns and adjust future ones based on performance.
Conclusion
Scheduling Mailchimp campaigns using Google Calendar helps organize your marketing efforts and ensures timely execution. While Google Calendar can't directly send campaigns, integrating it with Mailchimp provides a systematic approach to planning and tracking your campaigns. Following this simple step-by-step guide, you'll stay on top of your campaigns and improve your productivity and workflow. Start using Google Calendar today and watch your email marketing efforts become more efficient and timely.
On this page
Why Use Google Calendar for Scheduling Mailchimp Campaigns? Step 1: Create Your Mailchimp Campaign Step 2: Determine Your Campaign Send Time Step 3: Add Mailchimp Campaign to Google Calendar Step 4: Use Recurring Events for Ongoing Campaigns Step 5: Sync Google Calendar with Mailchimp Step 6: Track and Adjust Your Campaigns Best Practices for Using Google Calendar with Mailchimp: ConclusionAdvertisement
Related Articles

Top 8 OnePageCRM Sales Strategies to Close More Deals in 2025
Quick Ways To Turn Image Into Text Using Google's Apps
How Can You Automatically Send Emails for New Airtable Records?
How to Reverse a Clip in Premiere Pro Without a Hitch
How to Use Reflector 3 and Get 7 Screen-Mirroring Alternatives

The Ultimate Guide to Blurring Your Background on Zoom

How to Use JustCall and ChatGPT for Smarter Customer Service?

How Can You Collect Customer Feedback and Take Action with Enalyzer?
How to Capture and Analyze Site Launches with Web Launch Recorder and Its Alternatives
How To Add Custom Search Engines To Chrome—Try These 7 Search Engines
How to drive more conversions from your events with Addevent
