 novityinfo
How to Customize Your iMovie Videos with Stunning Filters
Advertisement
Creating a video hardly needs any special skills or technical knowledge. Using iMovie gives you easy-to-use tools that can boost your videos. You can make a difference fast by doing this. Filters. Adding the ideal filter can make your video look better, more stylish and keep everything looking the same across the film. In this guide, you learn the best ways to use iMovie’s filters on your videos for YouTube, classroom assignments or business projects. It’s time to start now!
Why Filters Matter in Video Editing

Applying filters isn’t just about aesthetics; it’s about storytelling. Filters can help you create a specific tone or mood, enhance underwhelming footage, or ensure consistency across different clips. Wondering when to use filters?
- Set the mood: Use warm filters for a cozy vibe or cooler tones for a dramatic effect.
- Fix lighting issues: Filters can help correct poor lighting or color imbalances.
- Achieve consistency: If you’re using clips shot in different lighting conditions, filters ensure a cohesive look.
Getting Started with iMovie
Launch the app and import the footage you want to edit. If you’re new to iMovie, here’s a quick refresher on how to set up your project:
- Create a new project: Open iMovie and click on the "+" sign to start a new project. Choose whether you want to create a "Movie" or "Trailer." For filter customizations, "Movie" mode is your best choice.
- Import media files: Drag and drop video clips and audio files from your computer into the media library.
- Drag clips to the timeline: Arrange your clips in the timeline at the bottom of your screen. This is where all the editing magic happens.
Once your project is set up, you’re ready to choose filters.
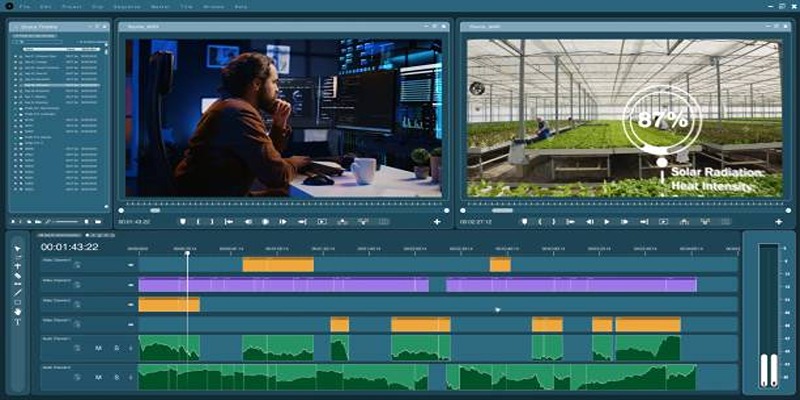
How to Add Filters to Your Videos
iMovie provides an intuitive way to apply filters directly to your clips. Here’s how you can do it:
- Select your clip: Click on the video clip in the timeline that you want to customize.
- Open the Adjustments Bar: Look for the "Adjustments" toolbar located above the preview screen. Click on the "Filters" icon, which looks like three overlapping circles.
- Browse Available Filters: A selection of filter thumbnails will appear. Browse through options like “Vintage,” “Sepia,” “Dreamy,” and more. Each thumbnail provides a preview of how the filter will look on your video.
- Apply Your Desired Filter: When you’ve found a filter you like, click to apply it. You’ll see the changes take effect immediately in the preview window.
Done! Your video has a filter applied. But we’re not stopping there. Next, we’ll talk about how to fine-tune these filters and truly make them yours.
Customizing Filters for a Personalized Touch
Although the preset filters in iMovie are great, you might want to go further by adjusting color, brightness, contrast, and other elements. Here’s how you can customize beyond the basic filter application:
Adjust the Intensity of a Filter
While iMovie doesn’t have a direct slider to change filter intensity, you can simulate this by balancing the filter with manual color adjustments.
- Open Color Correction Settings: Click the color adjustment feature (represented by a palette icon) in the Adjustments toolbar.
- Fine-Tune Your Colors: Adjust sliders for brightness, contrast, saturation, and temperature to complement the filter without overpowering your video. For a softer look, reduce brightness and saturation slightly.
- Experiment and Preview: Don’t hesitate to test different combinations to achieve your ideal effect. You can always undo changes if necessary.
Add Different Filters to Multiple Clips
Want to give each segment its unique vibe? While keeping the overall aesthetic cohesive, you can apply different filters to various clips:
- Select Separate Clips: Click on individual clips in the timeline. Filter changes will only impact the selected clip.
- Adjust Each Clip Individually: Apply filters one-by-one and tweak them as needed. This works well if your video has multiple “scenes” with varying tones.
By customizing filters for each clip, you can create a dynamic viewing experience that keeps your audience engaged.
Pro Tips for Using Filters Like a Pro
While filters can take your video to the next level, using them thoughtfully is crucial. Here are some expert tips:
- Keep It Subtle: Avoid overusing filters, as heavy effects can distract from the content and make the video look artificial. Subtle adjustments often yield the most professional results.
- Match the Mood: Ensure the filters align with the tone and emotion of your video. For instance, warm tones work well for cheerful, uplifting scenes, while cooler tones complement dramatic or somber moments.
- Test Before Finalizing: Preview your filters on the entire video before exporting to ensure consistency and to catch any areas that might need further tweaking.
- Blend with Natural Lighting: If possible, use filters to enhance, not overpower, the natural lighting captured in your footage. This creates a more authentic look.
By implementing these techniques, you can effectively leverage filters to enhance your video’s narrative without compromising its quality.
Final Thoughts
Making videos can be a fun and rewarding experience, but it can also be time-consuming and challenging. With iMovie, you have access to a variety of tools and features that can help you create professional-looking videos with relative ease. Don't get discouraged if your first few attempts fall short of your expectations – keep practicing and experimenting until you find the right combination of techniques that works for you. And remember, the most important thing is to have fun and let your creativity shine through in every video you make!
Advertisement
Related Articles

10 Reddit Automation Ideas You Need To Try In 2025

How Can You Connect Firebase to Google Sheets for Real-Time Data Syncing?

How to Schedule Mailchimp Campaigns Using Google Calendar: A Step-by-Step Guide

How to Use JustCall and ChatGPT for Smarter Customer Service?

How Can You Automatically Capture Leads from Facebook Lead Ads in RD Station?
Got a Video? Here’s How to Play It on Apple TV in 7 Ways

How To Add Custom Search Engines To Chrome—Try These 7 Search Engines

The Ultimate Guide to Blurring Your Background on Zoom

Microsoft To-Do automation can simplify your daily planning

Discover the Benefits and Uses of SimpleTix for the Event Ticketing Process

Steps to Add Hyperlinks in Gmail